
Did you know that many Agile teams fail simply because their Product Backlog is not in good shape and it becomes increasingly difficult when you’re trying to learn Jira and how the Product Backlog should fit within it. So in this post I’m going to show you what a good Product Backlog looks like and five ways to indicate whether your items are sufficiently detailed or ‘Sprint Ready’ as it’s commonly called.
The DEEP acronym
So what makes a good Product Backlog? A useful acronym to use is DEEP. Now I like this acronym, but I also don’t like it – I’ll tell you why I don’t like it but let’s go through it first.
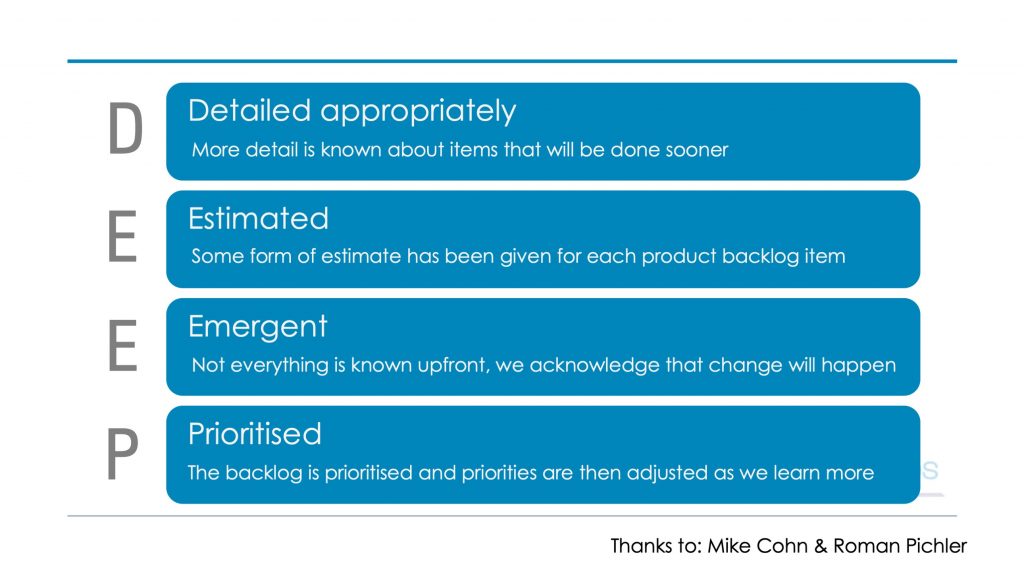 The DEEP acronym can be used to describe the attributes of a good Product Backlog
Detailed Appropriate
D stands for ‘Detailed appropriately’ and what we’re saying here is that there should be more detail for the items towards the top of the Product Backlog versus those at the bottom. Why do we do this? Well think of it this way, the items towards the bottom of your Product Backlog are of lower priority which means they won’t be done for quite some time. If they’re not going to be done for quite some time then what could happen – it’s likely those details will end up changing, so if we put in a lot of effort and detail into those lower priority Product Backlog items but they’re going to end up changing then that’s wasted effort, and we could have mobilised the team in a better way.
However we still want to see the bigger picture, we still want to understand what we might be delivering in future, hence we still need those lower priority Product Backlog items they just have less information and they’re more like placeholders, at least initially.
Estimated
E is for ‘estimated’. If we don’t estimate the work then how can we determine the return on investment and in turn prioritise effectively.
Emergent
The second E is for ’emergent’. When practicing Agile we don’t assume we know everything up front. As we deliver the work we’re going to receive feedback and learn. So we want to allow this Product Backlog to evolve or emerge over time, and as we better understand what our customers want we’ll adjust it accordingly.
Prioritised
Lastly, P for prioritised. The Product Backlog should be prioritised helping the team focus on what’s most valuable to your customer and avoiding being distracted by what is not a priority.
Let’s make your Jira Product Backlog DEEP!
Now you know what attributes make a good Product Backlog let me show you how to make your Jira Product Backlog ‘DEEP’. To demonstrate I’m going to use the Product Backlog that’s part of the AxisAgile Apps sandbox data. If you would like to import this data and follow along, use the link below:
How to make sure your Product Backlog is ‘Detailed Appropriately’
The first thing we want to do is make sure that this Product Backlog is detailed appropriately. So what does that mean? As I mentioned we want to have more detail for the items towards the top of the Product Backlog which is what we are going to do in the nearer term and less detail for the items towards the bottom.
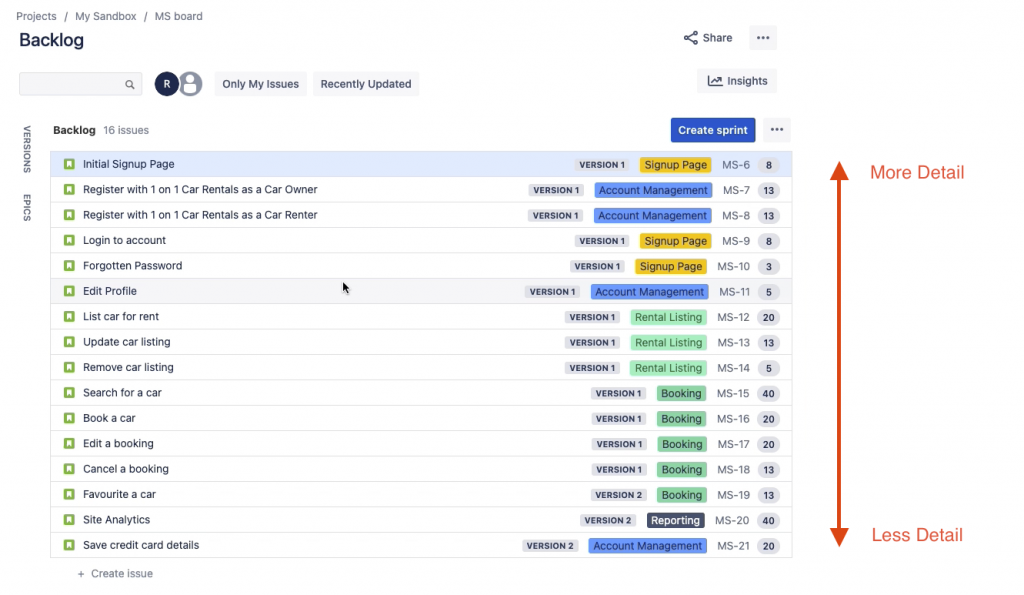
The Product Backlog in Jira should have more details towards the top, and less detail towards the bottom.
Jira Epics
Before we cover adding detail to these Product Backlog items we want to understand the Product Backlog at a more broader level so we can see the bigger picture. A useful way to do this is to use what’s called ‘epics’ in Jira. The term ‘epics’ is a confusing one because people in the Agile world define it differently from the way it works within Jira, so what I’m going to do is describe epics the way Jira defines it, and the way Jira defines it is as a collection of Product Backlog items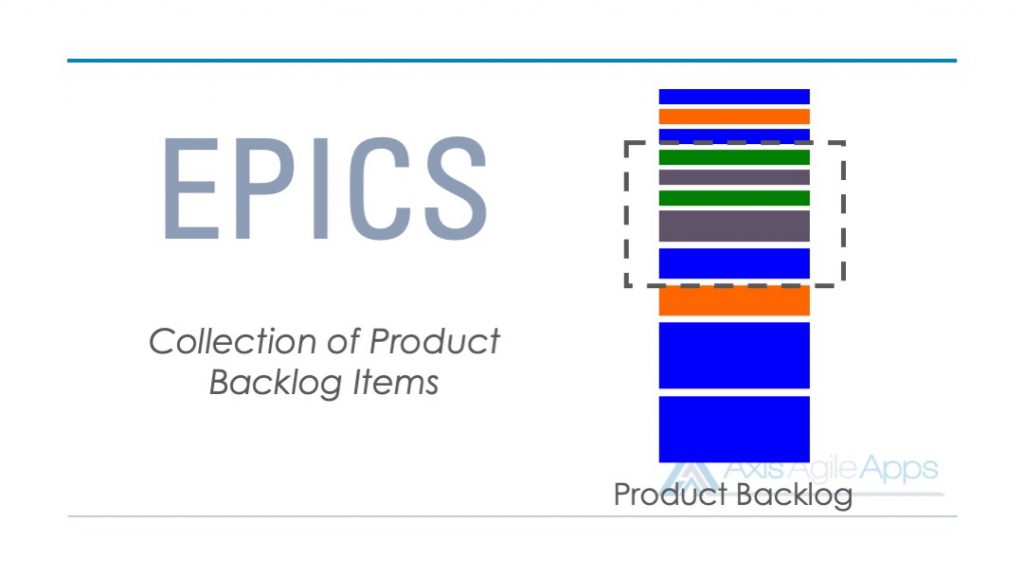 Epics in Jira
To see our epics we can click on the ‘Epics’ link to the left of the Product Backlog and you can see below I have this list of epics that describe my product broadly.
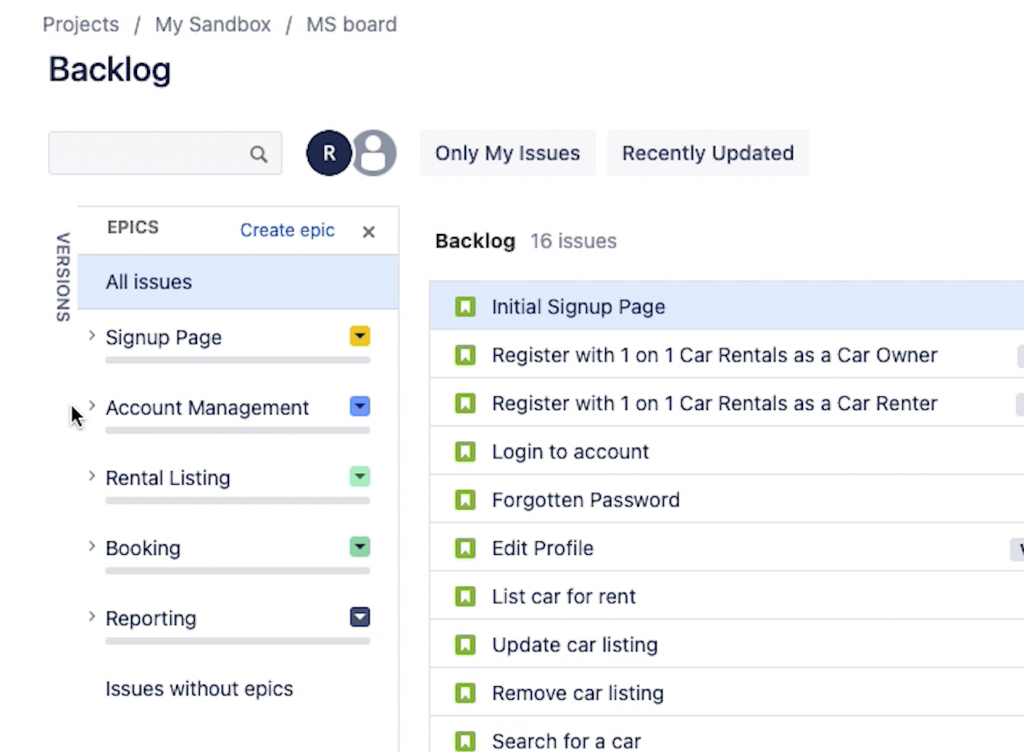
Epics in Jira can be used to see the bigger picture
For example I have one called ‘Account Management’ which contains all the Product Backlog items related to signing up and creating an account. I have another here called ‘Signup Page’ which has all my Product Backlog items related to creating the the actual signup page. At a glance we can see the broad brushstrokes of this Product Backlog and we can also see how we’re progressing with each.
By clicking on the chevron you can see the number of issues that are associated to this epic, and of those which ones have been completed, which ones don’t have an estimate and also the total estimate for all the Product Backlog items within that epic.
My tips:
- Keep epics to a minimum. You can see there’s not a whole lot of screen real estate.
- Keep the names to be no longer than about 20 characters. When you go over that it starts to get cut off in the Product Backlog view and can be hard to read leading to confusion.
When you click on the epics it will filter and display only those Product Backlog items that are associated with it. To go back to seeing all our Product Backlog items simply click ‘All issues’.
Let’s now look at how we add detail to those high priority requirements. We want to start from the top and make our way down. A common question I usually get is how far down or how far ahead should we be refining these Product Backlog items – we recommend you stay 1 – 2 Sprints ahead. In other words you want to refine those Product Backlog items that the team will be working on in the next Sprint and potentially those that are in the Sprint after that. This is sometimes referred to as ‘rolling wave analysis’.
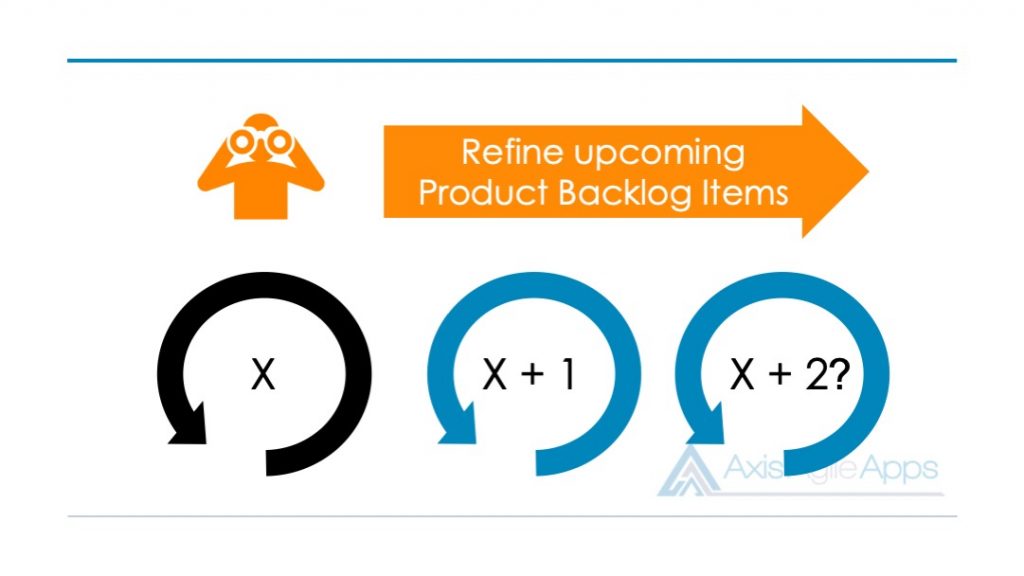
Stay 1 – 2 Sprints ahead with well defined, ‘Sprint Ready’ Product Backlog Items
Add a description
So what detail do we add first? We want to make sure we have a description of the Product Backlog item. The most popular format used by Agile teams is the User Story and you can see here I have a User Story and some acceptance criteria:
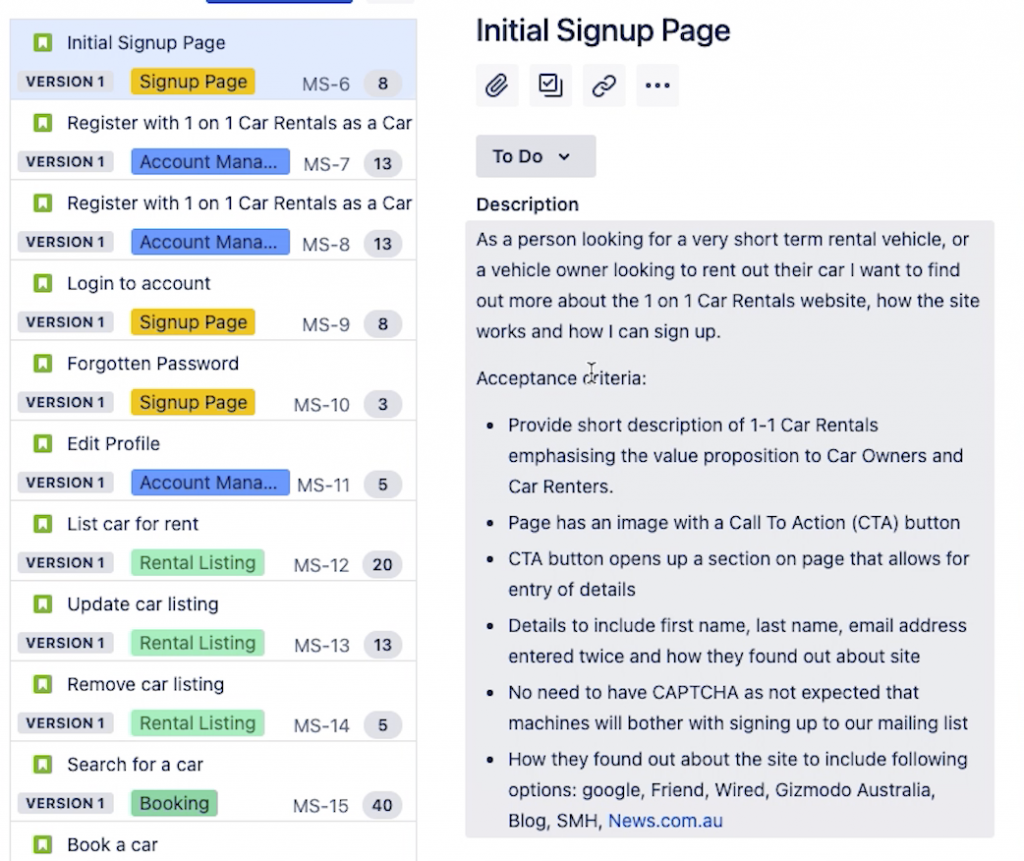
User Stories are a great starting point to kick-off a discussion about what’s required
This is a great starting point to kick-off a discussion. You want to make sure that you’ve involved stakeholders in the creation of these descriptions to make sure their needs have been considered, and your delivery team, to ensure they assess it for feasibility and propose potential solutions.
So this User Story is a placeholder for a conversation to occur and then through those conversations we refine and add more detail to it. As an Agile coach I strongly encourage that you make those conversations are face-to-face. Having face-to-face conversations ensures that you and your team are communicating as effectively as possible. If we instead communicate by phone or even worse by throwing emails back and forth, then we lose a big part of how we communicate as humans – that is through body language, facial expressions and tone-of-voice. So if possible always try to have face-to-face conversations whether it’s in person or using a tool like Zoom or Microsoft teams.
Attach additional information
While the description is great it’s typically not enough, teams need more information to really understand what needs to be done. This additional information could be in the form of mockups, wireframes, business rules, process diagrams and so on.
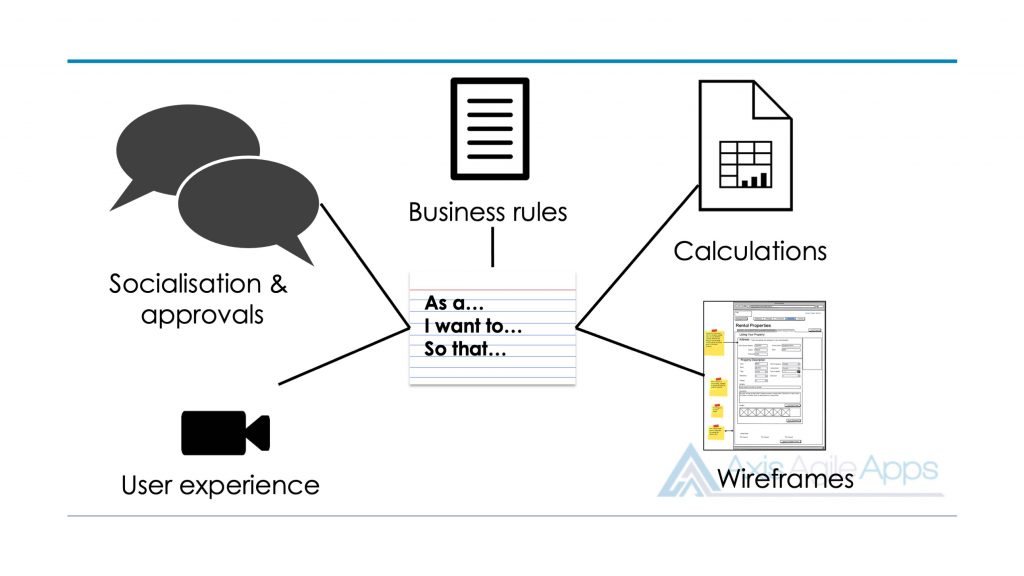
Use attachments to include additional information that is relevant
So how do we include these additional details? In Jira we use the attachment feature – for example let’s imagine my team has spent some time creating a wireframe to get an understanding about how this product should look, we simply click the attach button (see below), and we can associate it with the Product Backlog item.
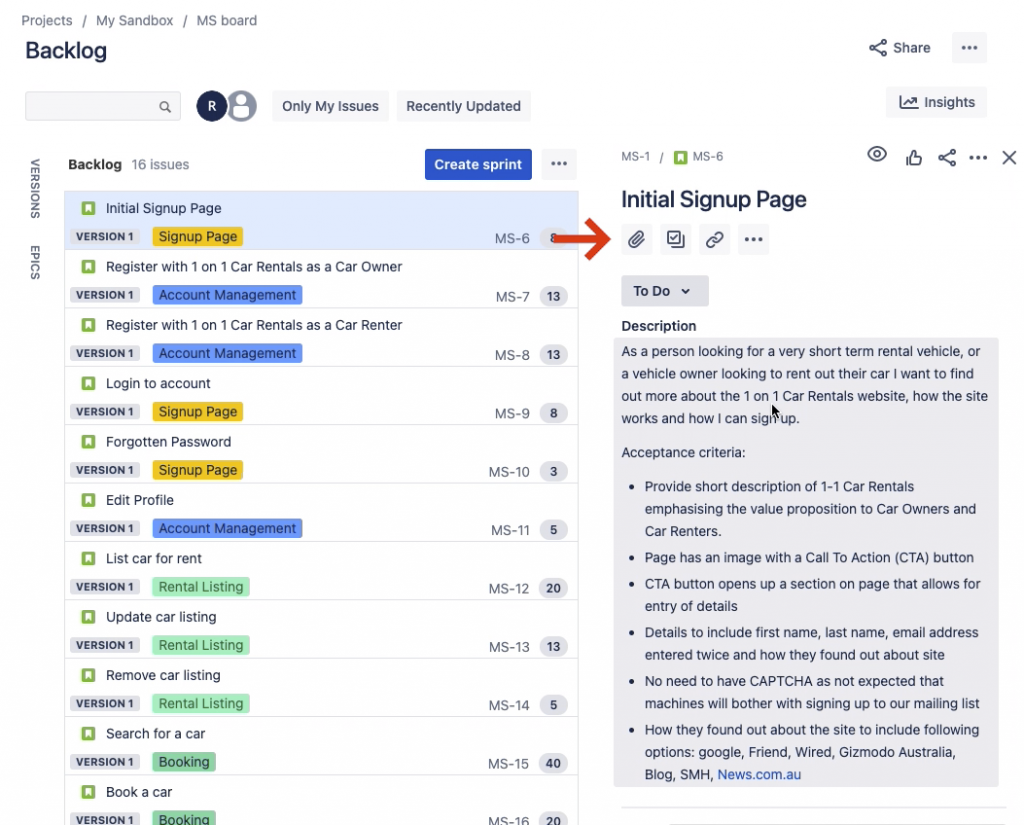
Attach items to Product Backlog items in Jira
So now my team can refer to that if they need more information. Again we can attach any additional information that’s required it could be business rules in a document, test data in a spreadsheet, I even met one team that used to record interviews with customers and attached those interviews, the actual videos, so it’s really up to you and your team. The goal here is to provide the team with what they need to achieve the outcome that we’re after.
Apply an estimate
Next we want to estimate this Product Backlog item. But in Agile we want to do this collectively with the team. By doing it collectively with the team we’re going to achieve a more accurate result. So how do we determine what the estimate is? The most popular technique with Agile teams is to use what’s called Planning Poker. The idea behind planning poker is we use the wisdom of a crowd to triangulate in on an estimate and in this situation the crowd is the Agile team. I’m not going to go over what Planning Poker is but if you would like to read about it check out the link below:
https://www.axisagile.com.au/blog/estimation/planning-poker-at-pace/
So let’s assume the team agrees on an estimate using Planning Poker, where do we note down this estimate in Jira? We use this field called ‘Story Points’ and you can see that by scrolling down to the bottom half of the Product Backlog item view, under the ‘Details’ section. Jira will use this field to generate reports on how your team is tracking.
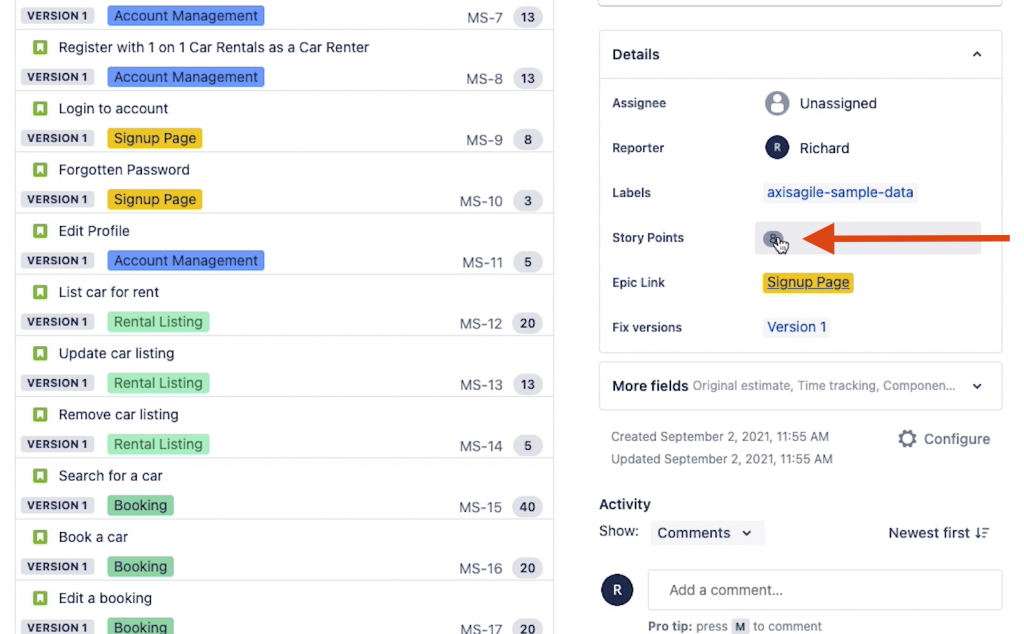
During Planning Poker sessions capture the agreed estimates by recording them in the Story Point field
Specify a version
Lastly you should assign a version to your Product Backlog item. You can do that by updating the “Fix versions” field:
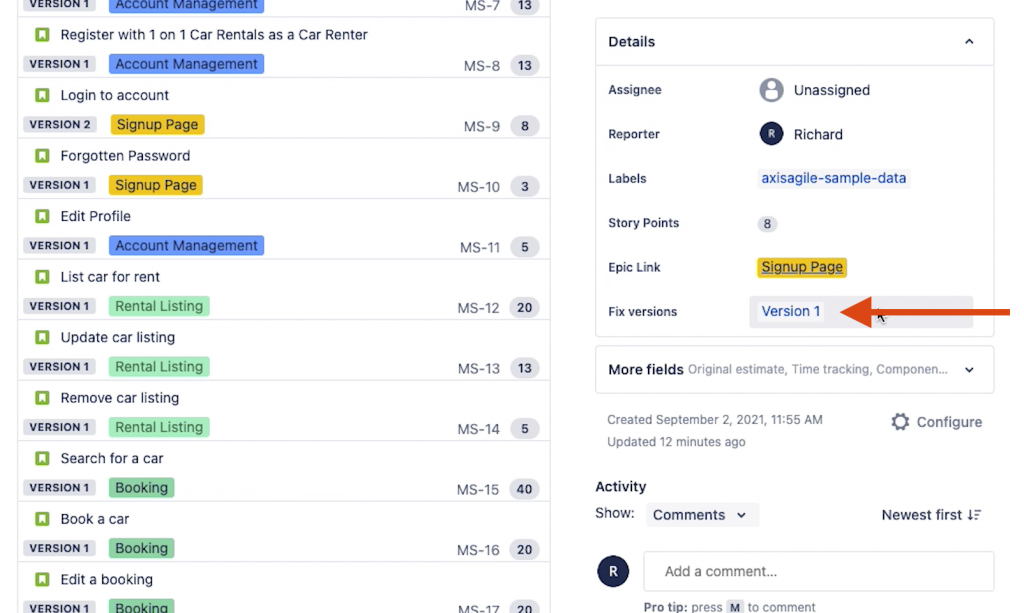
Specify what version this Product Backlog item belongs to, to help maintain focus
Alternatively, you can use the version panel which will pop out when you click the “Version” button next to “Epics”:
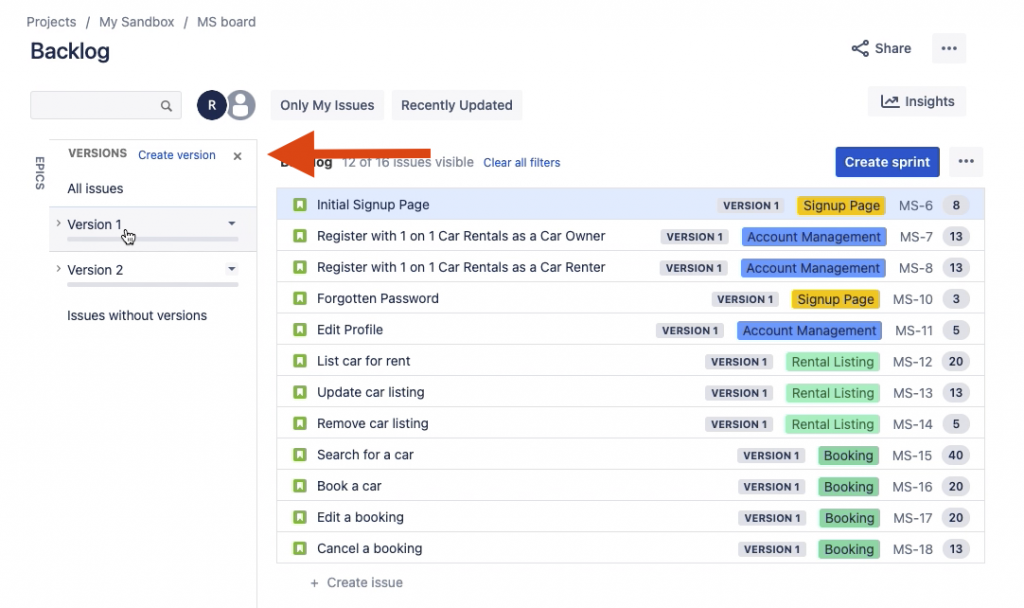
Use the ‘Version’ panel to see all versions and filter the Product Backlog view
You can see that I have two versions here in the sample data and what I can do is filter the view based on which version I want to look at by clicking on them. This can help during Product Backlog refinement by staying focused on only the version that is relevant, and avoid being distracted by Product Backlog items associated with future versions that are going to be implemented in the longer term.
In Summary
In summary to refine your Product Backlog items effectively ensure each Product Backlog item that is going to be implemented within the next 1 – 2 Sprints has a:
- Parent epic
- Description
- Additional information attached
- Estimate applied
- Version associated
Once you have that level of refinement with your Product Backlog items we would typically call it ‘Sprint Ready’. In other words it’s ready to be brought to an upcoming Sprint Planning session to be planned for and then delivered in that upcoming Sprint. As part of Product Backlog refinement we want a way to signify that these items are Sprint Ready. This helps focus our Product Backlog refinement efforts and ensure we’re staying 1 – 2 Sprints ahead. So how do we indicate this in Jira? I’m going to show you five options.
5 ways to indicate Product Backlog items as ‘Sprint Ready’ in Jira
1) Use the ‘Sprint’ feature
First option is probably the most popular that’s out there and it’s to use the Sprint feature of Jira. It’s not using it as Jira intended but it can work well. What we can do is create a Sprint and name it “Sprint Ready PBIs”. Then we drag Product Backlog items that are Sprint Ready into this Sprint:
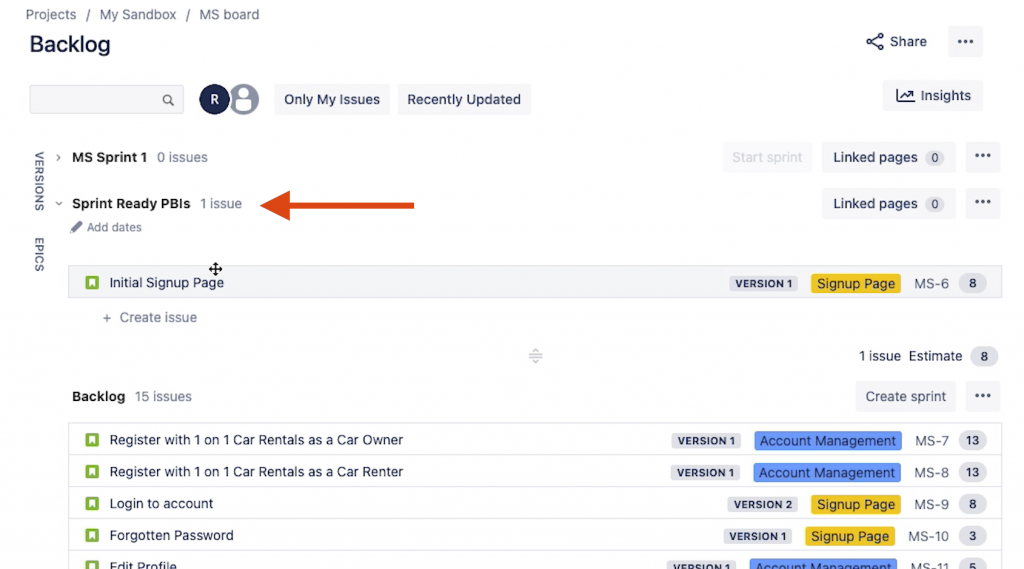
You can use Jira’s Sprint feature to identify ‘Sprint Ready’ Product Backlog items
While this works the downside is your Product Backlog items may no longer be in order of priority. For example a lower priority Product Backlog item might be Sprint Ready and by dragging it into the Sprint it will appear above other Product Backlog items with a higher priority.
2) Use the ‘flag’ feature
Second option is to use the flag feature in Jira. The flag feature (according to Atlassian’s documentation) is to flag an item and bring it to the attention of your team. So if you’re not using it yet for another reason it can work to indicate ‘Sprint Ready’ items. To use this option right-click on the Product Backlog item and select add flag:
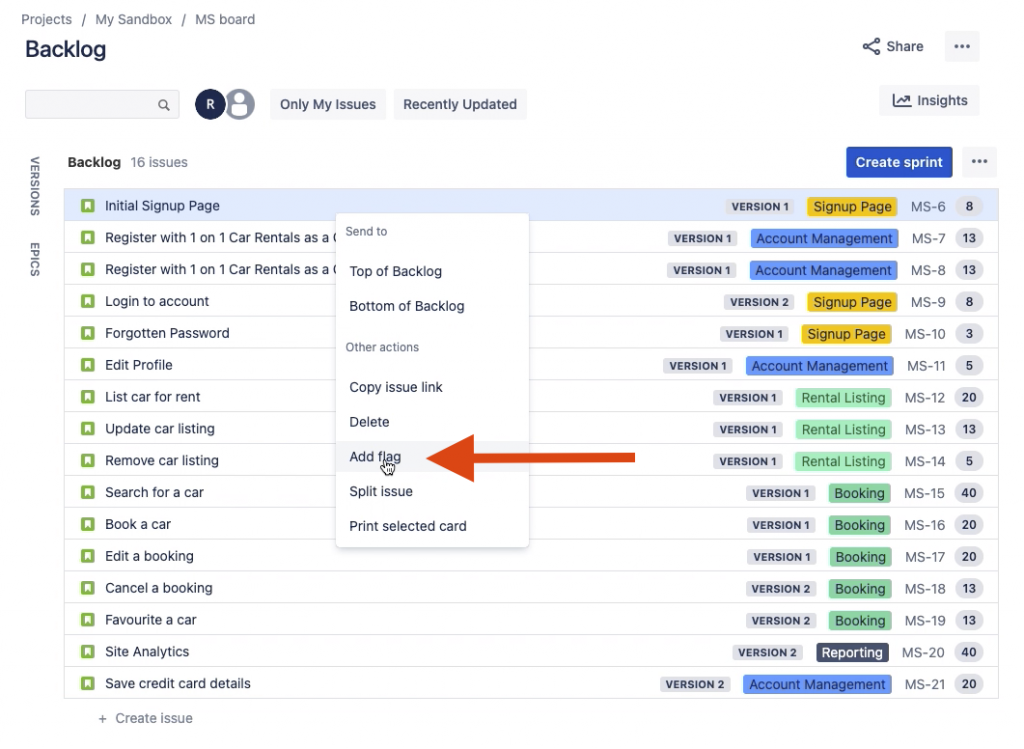
Add a flag to indicate an item as ‘Sprint Ready’ by right-clicking on the Product Backlog item
It will ask you to put a comment (you don’t have to) and after saving the Product Backlog item row will be highlighted and a flag visible:

After flagging an item the row will be highlighted and a red flag visible
3) Jira labels
A third option is to use labels in Jira. To do this we add a label called ‘Sprint-Ready’:
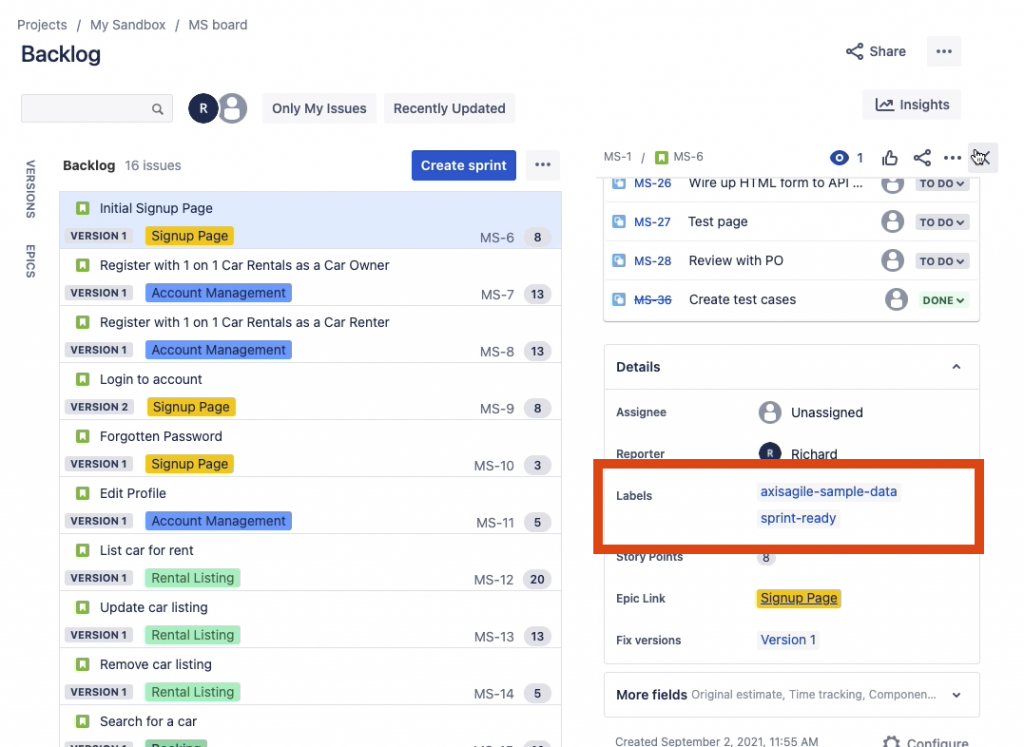
Apply a label called “sprint-ready” to indicate Sprint readiness
The ‘Sprint-Ready’ label won’t immediately show on this Product Backlog view so what you need to do is you add it to what Jira calls the card layout. To do that go up to the three dots in the top right and we click board settings:
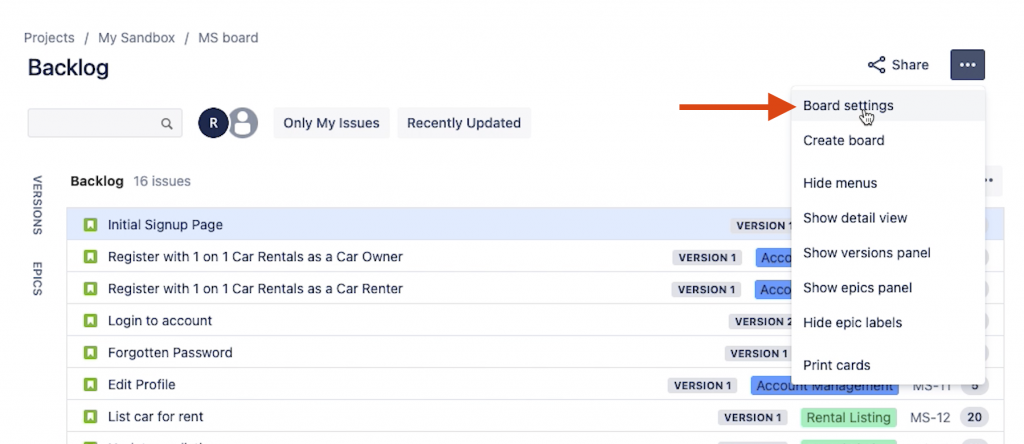
Add the ‘Sprint-ready’ label to the Product Backlog item card layout by going to ‘Board settings’
In board settings use the following steps to add labels to the card layout:
- Click on ‘Card layout”
- Select the field name “Labels”
- Click the “Add” button
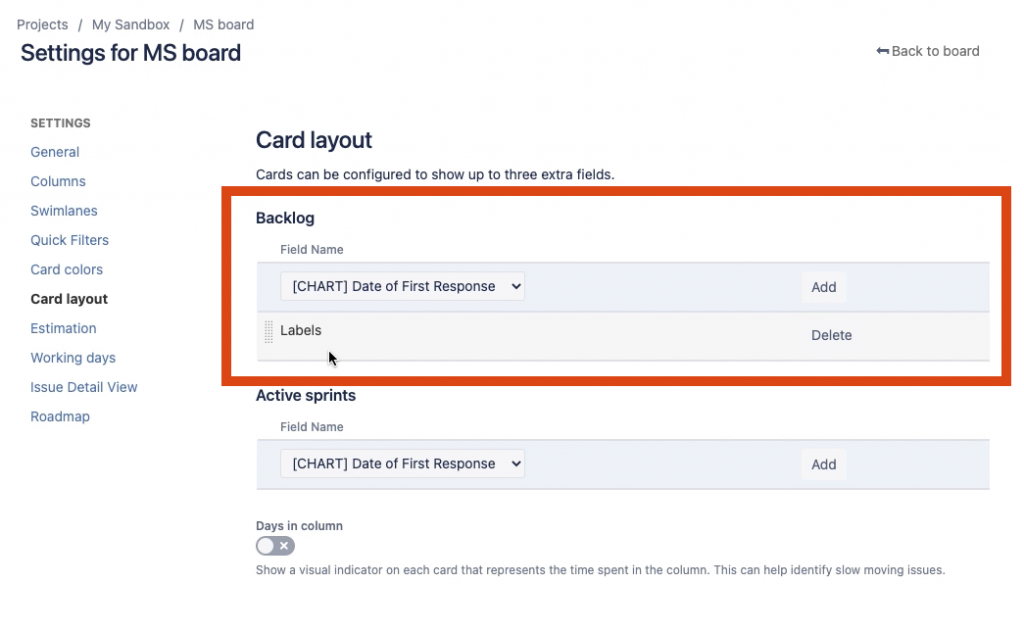
Add the ‘Labels’ field to the Product Backlog card layout
The labels will now show on the Product Backlog view:
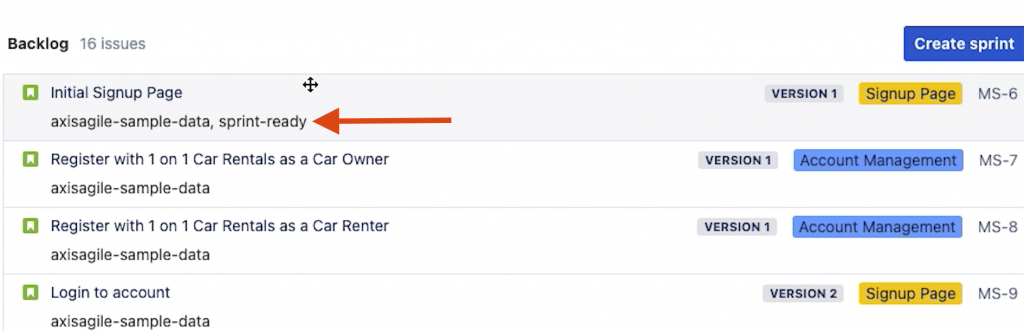
The ‘sprint-ready’ label is now visible on the Product Backlog item
The disadvantage to using this approach is it can become difficult to clearly see which items are Sprint ready if you have other labels applied.
4) Card colours
Fourth option is similar to using a label except instead of showing the label on the Product Backlog we can set a card colour, which will add a colour strip to the left side of the Product Backlog item.
Use the following steps to set this up:
- Go to the ‘Board settings’ as mentioned above
- Click on ‘Card colours’
- Select ‘Queries’
- To use it in conjunction with the label type in a JQL “labels=sprint-ready”
- Click “Add”
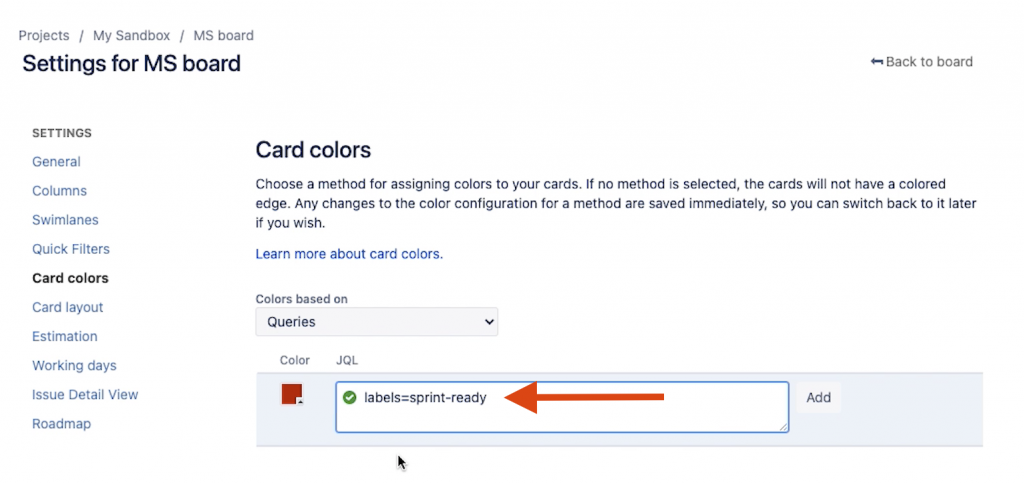
Set a card colour for any Product Backlog items with a “sprint-ready” label
Going back to the Product backlog view, the red strip will be visible for any items with the “sprint-ready” label:
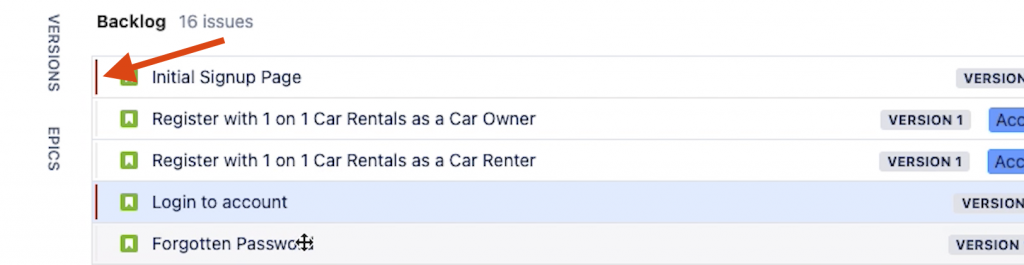
The card colour displays for items which are “Sprint Ready“
5) Customise your workflow
The last option is the most advanced and that is to customise your workflow. In this case we want to add an extra step to the workflow to indicate that the Product Backlog item is Sprint ready. To do that click on the settings icon in the top right corner (next to your avatar):
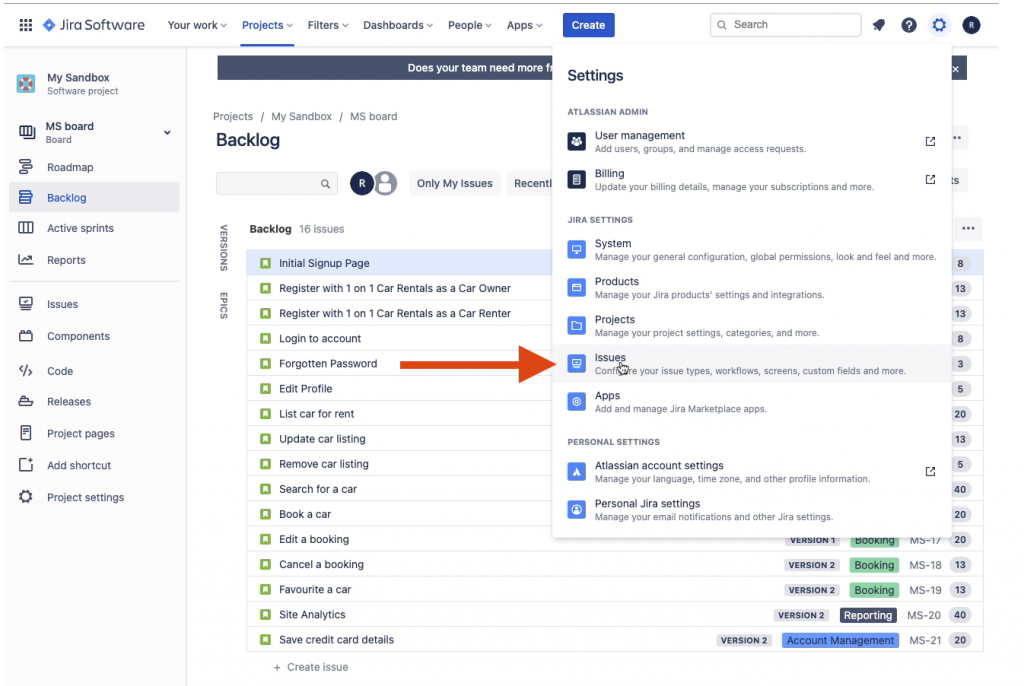
Go to “Issues” from the settings menu
Select “Issues” from the dropdown menu and then click on “Statuses” towards the bottom of the left menu:
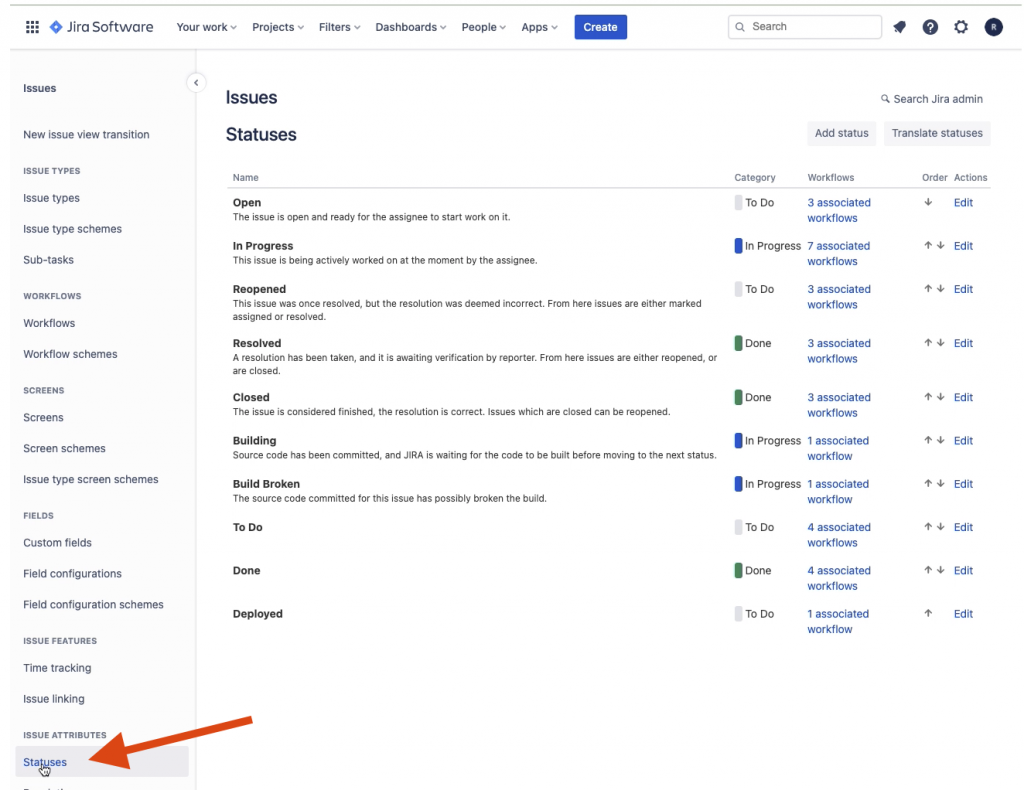
Go to the settings for statuses
Click on the “Add status” button, and create a new status called “Sprint Ready”:
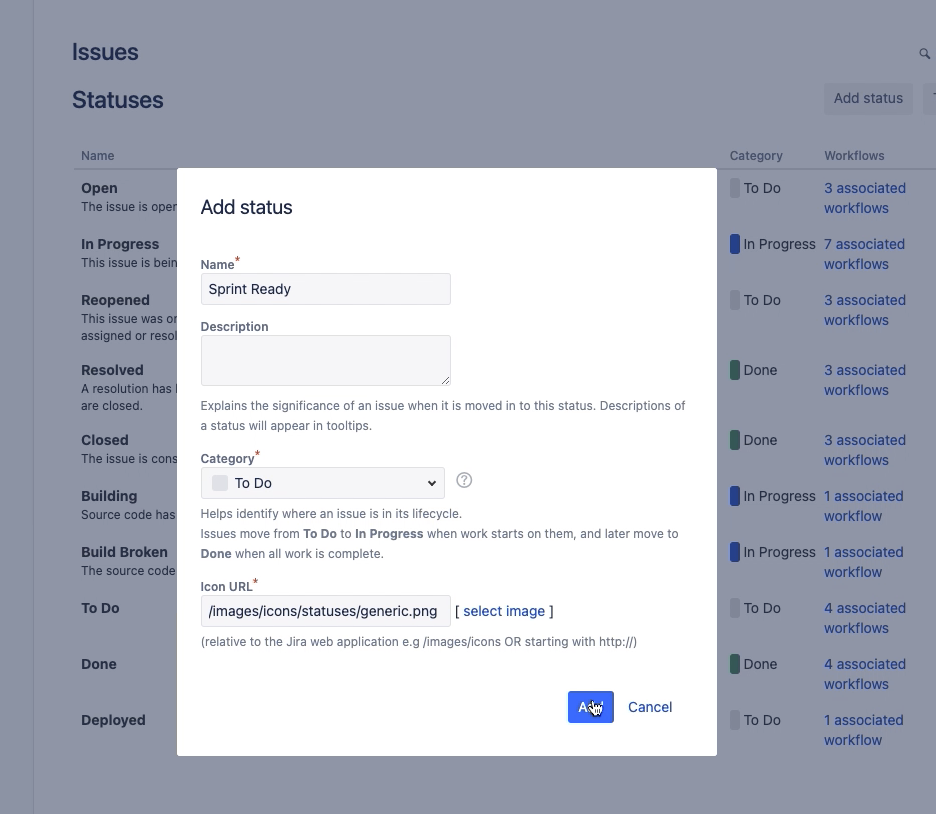
Add a new status name ‘Sprint Ready’
After adding a new status, next step is to go over to the workflow settings. This can be found by clicking on the “Workflows” link in the left menu:
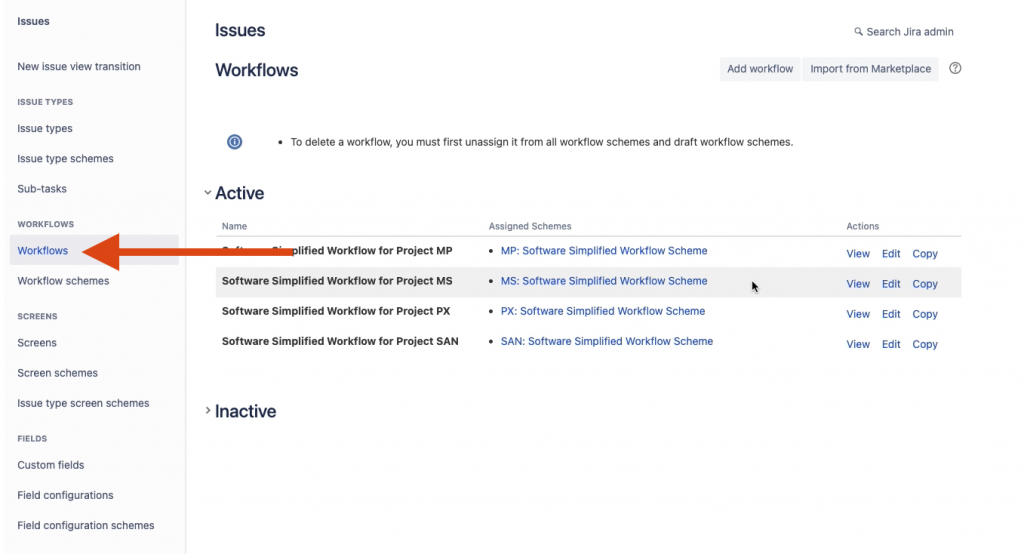
You will need to edit the workflow that is assigned to your project
Edit the workflow that is assigned to your project (you will need admin permissions for this), and from the edit screen click the “Add status” button to add the new “Sprint Ready” status:
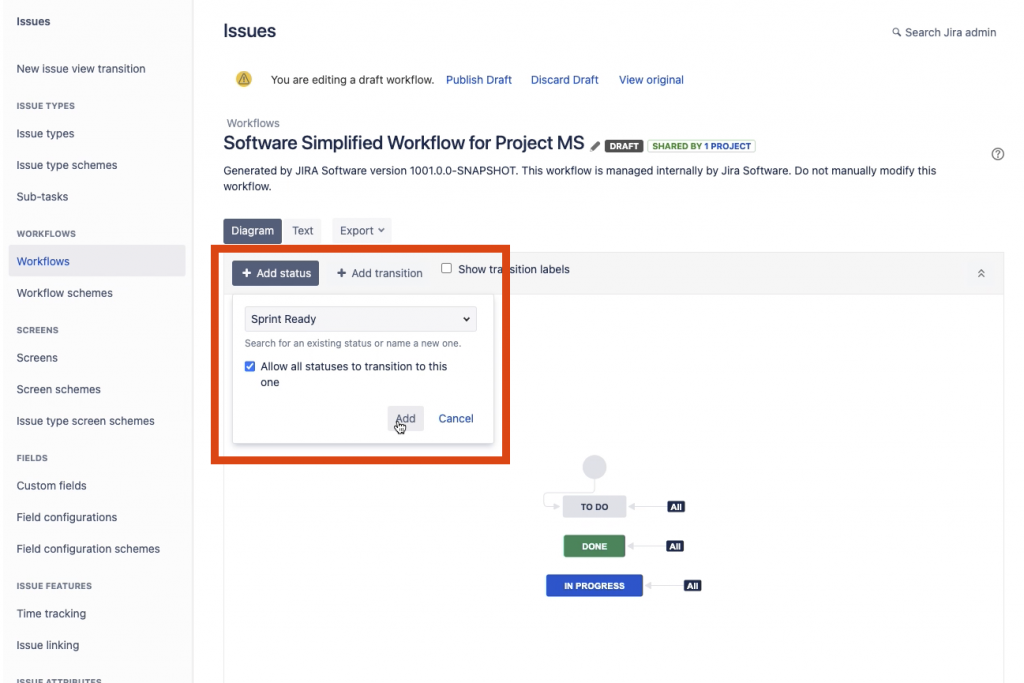
Add the new status to your workflow
Don’t forget to click ‘Publish Draft’ towards the top of the screen. Now when you click on a Product Backlog item the new status will appear in the status list:

The ‘Sprint Ready’ status can be selected from the Product Backlog item view
Just like how we did it with the the label or the card colour, click ‘Board settings’ and on card layout add the ‘status’ field. When back on the Product Backlog view you’ll notice that initial sign up page has disappeared and that’s because that ‘Sprint Ready’ status hasn’t been mapped onto this view. To do that, go back to ‘Board settings’ again, select ‘Columns’ and drag the ‘Sprint Ready’ status to be under the ‘To do’ column:
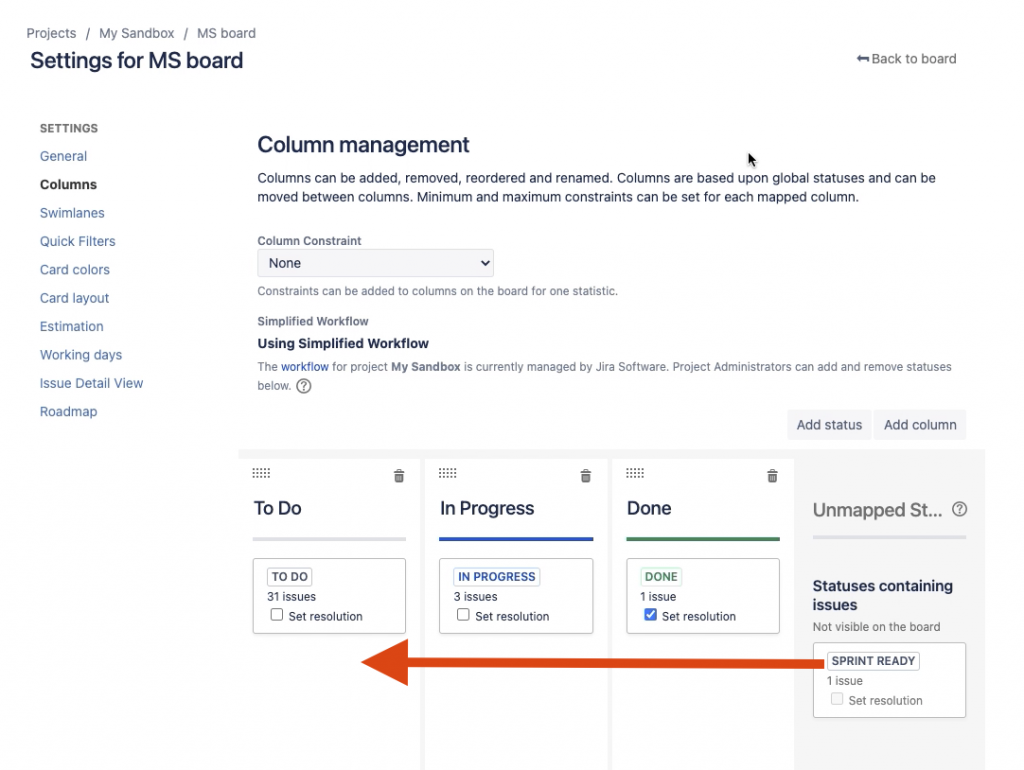
Map the ‘Sprint Ready’ status to the ‘To Do’ columm
Now the status will appear on the Product Backlog view:
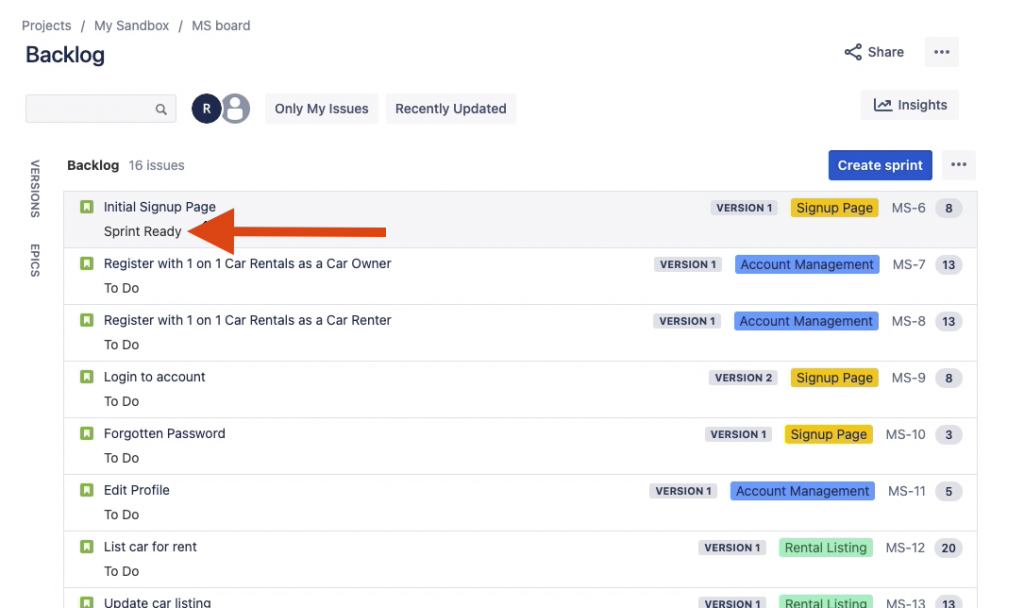
The ‘Sprint Ready’ status now appears on the Product Backlog view
Don’t forget!
Remember the advice is not go all the way down to the bottom of your Product Backlog, but to go down far enough that your team has enough Sprint ready items for 1 to 2 Sprints. By staying ahead ensures your team is never receiving Product Backlog items that are insufficiently detailed.
So there you have it five ways to indicate whether your Product Backlog items are sufficiently refined for the upcoming Sprint and meet the DEEP criteria.
So what don’t I like about the DEEP acronym? Well “deep” implies lengthy and I do meet a lot of Product Owners or Agile teams who have very long Product Backlogs. This can be a huge distraction so ideally I like to keep Product Backlogs to be no more than 80 items, from my experience that’s a manageable number. If you have more than that well I have a few final tips for you:
Firstly you could archive everything after the 80th move it to another list this could be another project Product Backlog or perhaps you filter it out of the Product Backlog view.
Alternatively check out our blog post on declaring Product Backlog bankruptcy:
https://www.mountaingoatsoftware.com/blog/preview/product-backlog-bankruptcy
Finally you can check out an app that we created called Agile backlog tools we use this with many teams to help them get their Product Backlogs in good shape:
Try Agile Backlog Tools for free for 30 days by clicking on the link below: